

Celebrate!
Toast!
Raise your glasses to increasing vaccine availability and toasted oats!
YES! Thank You Elizabeth ( blogfromourkitchen) out Kitchen of the Month! (You should know that every month, Elizabeth is the Babe who does the graphic magic to create our unique logo for each bread.) This is certainly a winner in our virus snow bound abode.
Toast these oats in a skillet not the oven! YES!! Oh and I do appreciate you have to stand totally at attention at the stove to avoid catastrophe but you have to keep an eye on the oven as well and the stove top for me took all of 5 minutes 30 seconds.

Toasted Oats Bread ~ BBB
Leavener
- 60 grams whole wheat flour
- 60 grams water
- 40 grams starter from the fridge (about 30 grams)
Oats
- 100 grams rolled oats, toasted
- 110 grams boiling water
Actual Dough
- 100 grams 100% organic whole wheat flour
- 400 grams unbleached all-purpose flour
- 5 grams wheat germ
- 5 grams rye chops
- 8 grams diastatic malt
- 325 grams water
- all of the leavener from above,
- 10 grams salt + 25 grams water
- all of the rolled oats mixture from above
Topping (optional)

- Rolled oats
- Leavener: In the evening of the day before making the bread: Put the starter, flour and water into a smallish bowl. Mix with a wooden spoon until the flour is stirred in well. I used a bread whisk. Cover the bowl with a plate (I use a shower cap) and set aside overnight in the oven with only the light turned on. Unless it is ridiculously hot in the kitchen. In that case, leave the oven light turned off.
- Prepare the Oats: Pour rolled oats into a dry cast iron frying pan and place it over medium high heat, stirring with a wooden spoon from time to time. It takes about about 7 minutes to toast the oats. (They smell wonderful!) (Previously when I’ve toasted oats I’ve done it in the oven. Toasting them in a skillet, gives you much more control and resulted in a uniform darkening color and much better flavor enhancement. Henceforth, I will be toasting in a skillet.) Transfer the toasted oats into a medium-sized bowl and pour boiling water over top. Cover with a plate and leave overnight in the oven with the leavener.
- Mix the dough In the morning of the day you will be making the bread: When a small forkful of the leavener floats in a small bowl of room temperature water (I have never tried this), you can go ahead and mix the dough: Sift the whole wheat flour into a large mixing bowl, reserving the bran for after shaping. I did not do the sifting. Add all-purpose flour, wheat germ, malted wheat chops (I thought I didn’t have malted wheat chops, turns out I did, used rye chops and some diastatic malt), and 325 water to the sifted whole wheat flour. Stir with a wooden spoon. (Again I used my bread whisk) Set aside for a moment.
- Weigh the salt and 25 grams water, whisking it together in a small bowl. Set this bowl aside in the oven with only the light turned on.
- Add the leavener to the large bowl. Use a dough whisk or wooden spoon to mix these ingredients together to make a rough dough. Cover the bowl with a plate (or shower cap) and leave on the counter for about 30 minutes.
- Adding the salt: Pour the salt mixture over the dough.
- Kneading: Use one of your hands to squish the salt and water into the dough; use the other hand to steady the bowl – this way you always have a clean hand. At first the dough might be a bit messy and seem like it’s coming apart. Persevere. Suddenly, it will seem more like dough than a horrible separated glop. Keep folding it over onto itself until it is relatively smooth. Cover with a plate and leave to rest for about 30 minutes.
- Adding the oats and first stretching and folding: Add the oats overtop. (First time I baked this, I had already added the oats. Since the first time I toasted oats in the oven, the color was altogether different. Ultimately, I don’t think the timing of adding the oats made much difference.) Turn the bowl as you fold and re-fold the dough into the center, to distribute the oats. Cover the bowl with a plate and leave on the counter (or if the kitchen is cool like ours in winter and spring, into the oven with only the light turned on).
- Continuing to stretch and fold: Repeat the folding step about 3 times in all at 30 minute intervals. After the final time of folding, leave the covered bowl in a draft free area until the dough has almost doubled.
- Pre-shaping: Scatter a dusting of all-purpose flour on the board and gently place the dough on the flour. Fold the dough over in half, gently patting off any extra flour that might be there. Turn the dough a quarter turn and fold in half again. Continue turning and folding in half until the dough is shaped in a ball. Leave it seam side down on the board and cover with a large overturned mixing bowl (or a tea towel) and let rest for about 30 minutes.
- Prepare the brotform: Liberally coat the insides of a brot-form with rice flour.
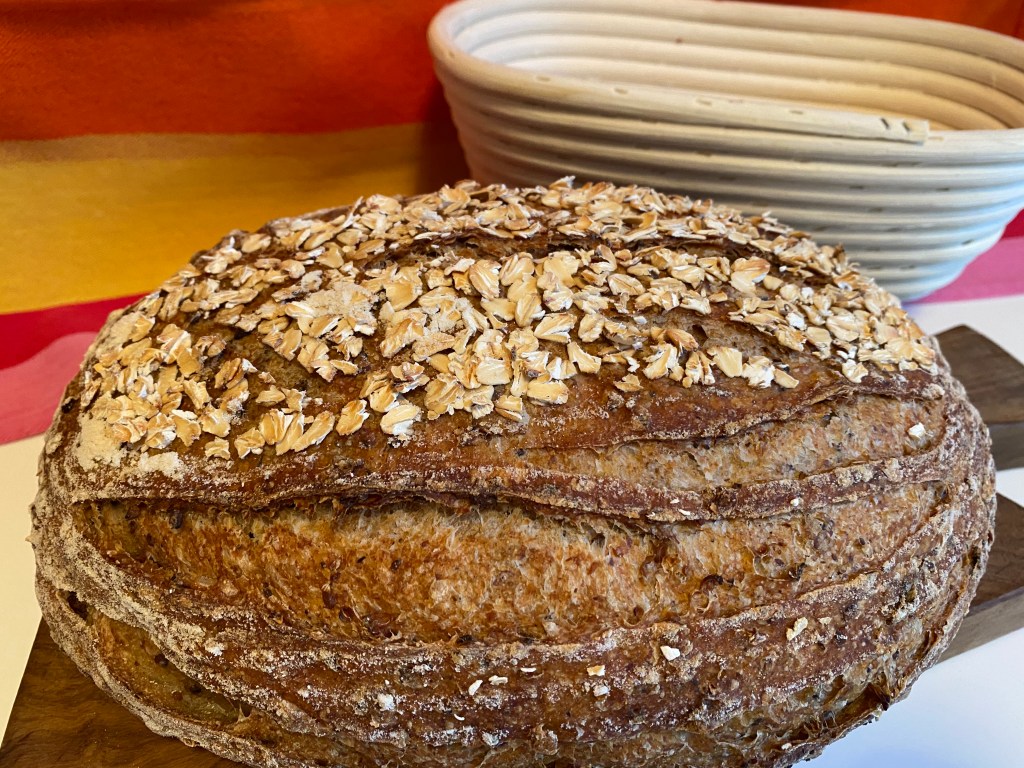
- Shaping and adding optional topping: Scatter a very light dusting of flour on top of the round. Gently press down with the palms of your hands to create a disc that is about 4 centimeters deep. Carefully turn the disc over. Without breaking the skin on the bottom, use the dough scraper to fold the dough in half. Turn the dough a quarter turn and continue folding until a ball is created. Leave it seam side down and use the sides of the dough scraper to tighten the dough ball further. Once it has been tightened, wet your hands and rub them gently over the top. Scatter quick oats overtop. Now carefully put the shaped loaf seam-side UP into the brotform. Scatter the reserved bran evenly onto the seam area. Cover with the tea towel or an overturned mixing bowl and let sit for an hour or so to allow the loaf to almost double. “Almost” is the key here….
- Preheating the oven: To know when it’s time to bake, run your index finger under water and gently but firmly press it on the side of the bread. If the dough springs back immediately, recover the bread and leave it on the counter for another 15 minutes of so. If the dough gradually returns back after being pressed, leave the bread on the counter. Put a baking stone on a lower shelf of the oven. Place a cast-iron combo cooker (or lidded casserole dish) on the middle shelf and preheat the oven to hot (we set ours to 450°F). (I opted for an oval brotform, without a cast iron oval large enough to bake it in, I baked the loaf on parchment paper, pushed it onto the hot baking stone in the oven and covered it with a very large stainless bowl.)
- Scoring: When the oven is thoroughly preheated about fifteen minutes later, transfer the round into the hot shallow pan of the combo-cooker. I adapted scoring to the oval shape I had. Using a lame, sharp knife, or scissors, score the bread in the pattern you like.
- Baking: Bake for 30 minutes with the lid on. After 30 minutes, remove the lid and, without stopping to stare in amazement at the amazing oven spring … actually I could not help but at least momentarily stare in amazement at the oven spring, close the oven door to continue baking for another 30 minutes, until the crust is a lovely dark golden brown and the bread sounds hollow when knuckle-rapped on the bottom. (Internal temperature probe showed 204°F.)
- Cooling: When the bread has finished baking, remove it from the oven and allow it to cool on a footed rack before slicing and eating; the bread is still cooking internally when first removed from the oven! If you wish to serve warm bread (of course you do), reheat it after it has cooled completely: To reheat any uncut bread, turn the oven to 400°F for 5 minutes or so. Turn the oven OFF. Put the bread into the hot oven for about ten minutes. This will rejuvenate the crust and warm the crumb perfectly.


Yes, this does look like an involved recipe. Yes, there are a number of steps. Yes, because it looks long, it looks difficult. The actuality is the single steps are spread out over time but are simple to execute with long stretches where you do whatever you like and a single step takes only a short bit time.
Do those short steps get you to a worthwhile goal … what a very foolish question, My answer is an emphatic YES!!! We would love to hear your answer:

I believe you should and will want to make toasted oats bread too! To receive a Baking Buddy Badge to display on your site, post about your toasted oats adventure in the next couple of weeks (we love to see how your bread turns out AND hear what you think about it – what you didn’t like and/or what you liked) before the 29 January 2021.
Here’s how to let us know:
- email Elizabeth
- » Remember to include your name and a link to your post
- » Please type “BBB January 2021 bread” in the subject heading
Now about next month…This little group started in February 2008 that means that next month we’ve been around … It’s our Anniversary! And for the first time ever I’m giving you a hint for next month’s bread. We’ll be playing around with…


January 16, 2021 at 3:51 pm
I love your gorgeous elongated loaf. Your bread is perfect! Beautiful crumb.
January 16, 2021 at 4:59 pm
Your loaf turned out wonderfully!! I bet that even the most curmudgeonly of tasters would agree that it’s perfect.
I’m so glad to hear that toasting the rolled oats in a pan on the stove worked for you. It seems like it takes up much less energy (no need to turn the oven on) and there’s so much more control.
As for kitchen utensils, etc., I am so envious of your oval banneton! I also love the patterns on those bread stamps; they are stunningly beautiful, and SO different from the patterns on the stamps I have!
January 16, 2021 at 6:04 pm
Oh, I wanted to make an oval but my brotform is just too small, I need a bigger oval. Yours turned out gorgeous! And I love your smallest stamp, so cute!
January 16, 2021 at 9:48 pm
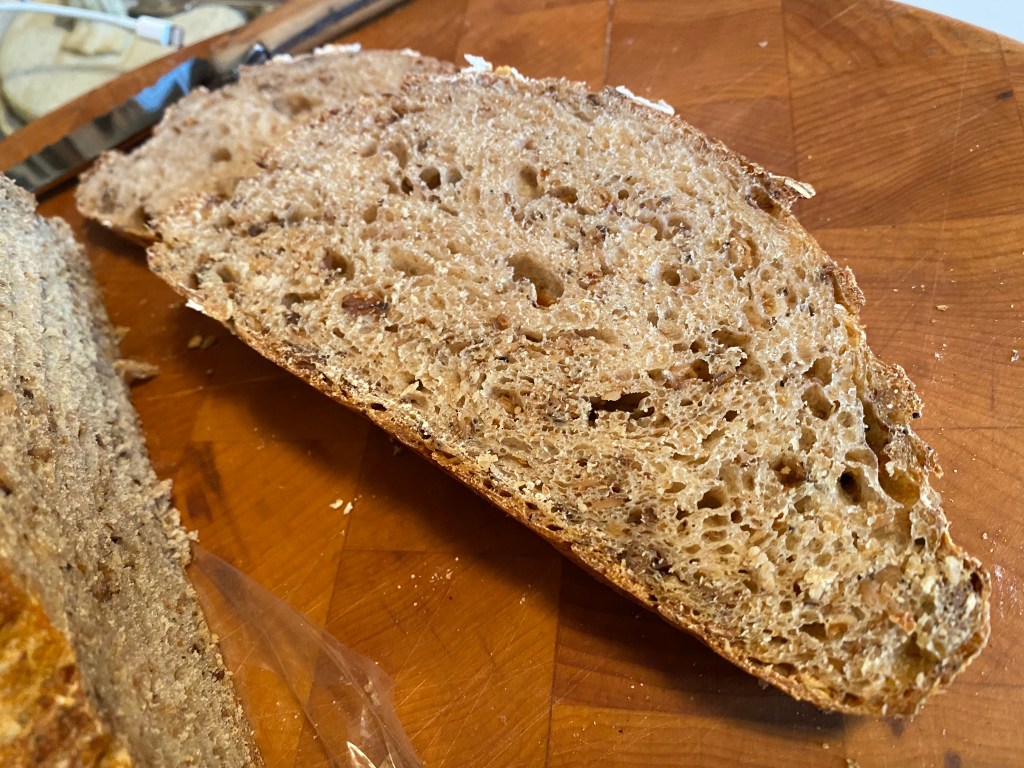
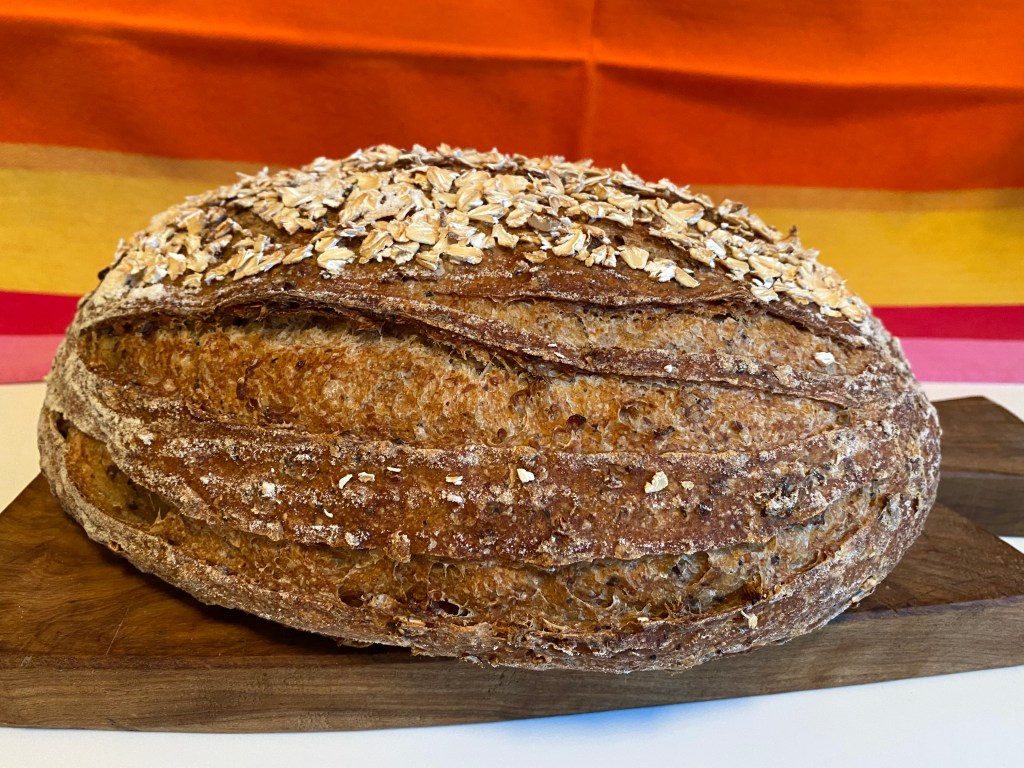
I love your oblong loaf. The crust and crumb look fabulous. I was tempted to make an oblong loaf myself but opted for round at the last minute. Toasting the oats on the stove is definitely the way to go.
January 17, 2021 at 4:13 pm
I guess I’d just baked several round loaves and needed a change.
January 17, 2021 at 11:44 am
Hmmmm I’m thinking I would love your kitchen. I know I would love your bread !
January 17, 2021 at 12:38 pm
Hmmmm, I’m wondering what you see that makes you think you would love my kitchen. You would love the bread, it is just clicks all the boxes.
Pingback: Bread Baking Babes sow some oats · Thyme for Cooking
January 17, 2021 at 3:24 pm
It’s a wonderful, chewy bread and those stove top toasted oats make all the difference. Your oval bread is gorgeous and I like the darker color inside and the open texture. For me, the best part is your crust…golden brown and perfect.
January 17, 2021 at 3:32 pm
Thank you Pat! It is just an excellent bread. I am going to skillet toast my oats from now on in any bread with oats.